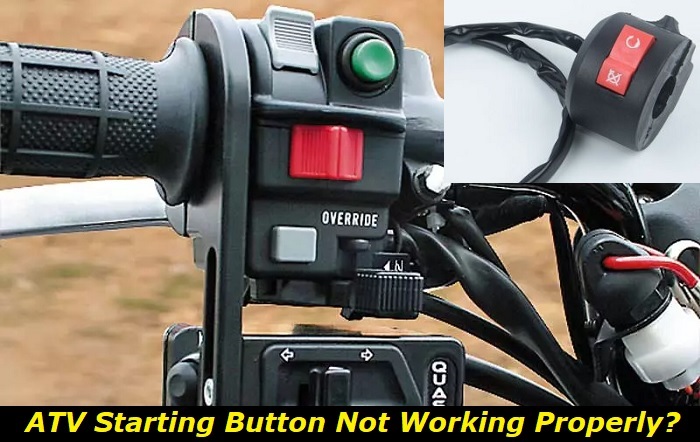
If you are having trouble getting your ATV started and the starter button isn't working, there may be an underlying issue that needs to be addressed. In this article, we will discuss common reasons why the starter button may not be functioning properly and how to fix these causes of the problem.
We will also look at parts that may need replacing and ways to temporarily remedy the problem with a bypass for emergencies.
Possible Reasons Why the Starter Button is Not Working
The most common reason why an ATV won't start after pressing the starter button is that there is no power being delivered to it. This can be caused by a number of different issues including corroded connections, a bad battery, or faulty wiring. Other potential causes include the starter button itself being faulty, a broken ignition switch, or a defective solenoid.
How to Fix the Causes of the Problem
If you suspect that there is no power being delivered to your ATV starter button when it should be, then you may need to check all relevant electrical connections and test the battery. If necessary, try replacing any corroded connectors or cleaning any dirt or debris from them.
Additionally, if you're having trouble finding out where certain wires go or what they're connected to, refer to the ATV's owner manual for further instructions.
Here's a more detailed discussion of how you can go about the common causes of the problem:
1. Bad Battery
A bad ATV battery can be an inconvenient and sometimes dangerous problem. The main symptom of a failing battery is when the starter button fails to start the engine even if all the other components are working correctly.
To check the battery, it's best to first use visual cues, such as looking for signs of corrosion on terminals or connections that may indicate low power. If this doesn't reveal anything, then using a multimeter to test its charge is needed.
When using a multimeter, readings between 12-13 volts usually mean that recharging is necessary. However, if the reading drops below 10 volts or it has 13 volts with no load, then it's most likely time for a replacement. This is because a battery that sits at 10 volts or lower for an extended time may be damaged and unable to hold a charge.
Always remember that when dealing with any kind of electrical components, safety comes first so it's best to exercise caution and get help from a certified technician if needed.
2. Faulty Wiring
Faulty wiring can cause the starter button to stop working due to a variety of issues. If a connection has become loose or corroded, it can lead to a disruption in the power supply, which will prevent the starter from functioning.
You can check for wiring problems by using visual cues and a multimeter. Look for broken insulation or exposed wires that could indicate potential shorts or grounds.
Likewise, you can use your multimeter to measure voltage drops across different connections and test if any current is flowing through them. If there is no current flow, then this could be an indication of a bad connection somewhere along the line.
In some cases, you may need to replace the entire wiring harness altogether if it has already been damaged beyond repair or no longer functioning as it should. This may be necessary if the insulation has been worn away or there are too many frayed wires.
3. Corroded Connectors
Corroded connectors can cause the starter button to stop working because they interfere with the electrical connection that is necessary for the starter system to function. This type of issue is common in vehicles that have been left outside or in humid environments, where moisture has caused corrosion to build up on metal surfaces.
To assess connector issues, it is important to look for any signs of visible corrosion or damage on the plugs and terminals. If there are no obvious indicators of a problem, then a multimeter can be used to measure current flow and detect if there is any resistance present in the circuit. If readings from the test are out of range, this could indicate that there may be an issue with one or more connectors.
If corroded connectors are found, they will need to be cleaned, repaired, or replaced. The common signs of corrosion include discoloration and the presence of white powdery residue on the terminals, which is a result of oxidation.
Additionally, there may be visible cracking or breakage in the plastic casing of the connectors. If any of these indicators are present, it is likely that repairs or replacements should be made as soon as possible to restore proper functionality.
4. Faulty Starter Button or Switch
Assessing starter button or switch issues can be done through visual hints and a multimeter. If the starter button is sticking, creaking, or does not return to its original position after being pressed, then it may indicate that the starter button or switch needs repair or replacement.
If a multimeter is used to test the connection of the wires at the back of the starter button or switch, one should expect continuity readings when measuring from terminal to terminal. In some cases, corrosion on terminals will prevent proper electrical flow and cause a non-continuity reading, which would also require repair or replacement.
Moreover, if there is physical damage such as burnt plastic around the terminals of the starter button or switch then this could also indicate that it needs to be repaired or replaced. Finally, if the starter button or switch does not make any sound when pressed, this could be a sign of an internal problem with the device that requires repair or replacement.
All of these issues should be taken into consideration when assessing the condition of the starter button or switch and determining if it needs to be repaired or replaced. In most instances, the best solution is to replace the button or switch if it's already showing significant damage or no power is flowing through its circuitry.
5. Defective Solenoid
When assessing the quality of a solenoid that may be causing problems with the starter button, it is important to look for any visual signs of wear and tear. Common indications include corrosion on the terminals, cracked insulation, or burns around resistance coils.
With a multimeter, you can check voltage drop across the switch contacts and compare this value against its expected ratings. If there is insufficient voltage passing through, this indicates that your solenoid needs repair or replacement.
Another key sign to look out for is an unusually high current draw when actuating the switch. This could mean that there is either an internal connection issue within the solenoid core or other components are not properly grounded. In either case, it's a good idea to immediately switch off the power and contact a qualified electrician for help.
One more sign of a faulty solenoid is if it doesn't lock into place when actuated. This could be due to either an internal mechanical issue or insufficient voltage passing through the terminals. If this occurs, you will need to open up the solenoid casing and inspect its internals. In some cases, you may even need to replace parts in order to get the part back into working condition again.
Ways to Remedy the Problem via a Bypass for Emergencies
If all else fails, you're in an emergency situation, or you are in the middle of nowhere and you find yourself facing this predicament, it is possible to temporarily bypass the starter button by connecting two wires from the battery directly into the ATV's starter motor. This should only be done as a last resort and should be reversed back to normal as soon as possible.
Bypassing the starter button is not recommended since it can have potentially dangerous consequences. If you are not careful when connecting the wires directly to the starter motor, there is a risk of damaging the electrical system or even causing an electric shock. Additionally, bypassing can lead to further problems in the long run if done repeatedly.
A safer way to go around this is by pull-starting the ATV if it comes with a pull-start mechanism. Its handle should be located on your left leg when riding the ATV or it may be concealed via a covering on the right in some cases.
Conclusion
In conclusion, it's important to first identify and address any underlying issues which may be preventing your ATV from starting despite pressing the starter button. The most common causes include problems delivering power to the button, corroded connections or faulty wiring, a bad battery, the starter button itself being faulty, and an ignition switch or solenoid that may need replacing.
If all else fails, it is possible to bypass the starter button for emergencies but this should only be done as a last resort and reversed back to normal as soon as possible. With the help of this guide, you'll now know how to approach any potential issue with your ATV's starter button and find ways to fix them in no time.
About the authors
The CarAraC research team is composed of seasoned auto mechanics and automotive industry professionals, including individuals with advanced degrees and certifications in their field. Our team members boast prestigious credentials, reflecting their extensive knowledge and skills. These qualifications include: IMI: Institute of the Motor Industry, ASE-Certified Master Automobile Technicians; Coventry University, Graduate of MA in Automotive Journalism; Politecnico di Torino, Italy, MS Automotive Engineering; Ss. Cyril and Methodius University in Skopje, Mechanical University in Skopje; TOC Automotive College; DHA Suffa University, Department of Mechanical Engineering


Add comment