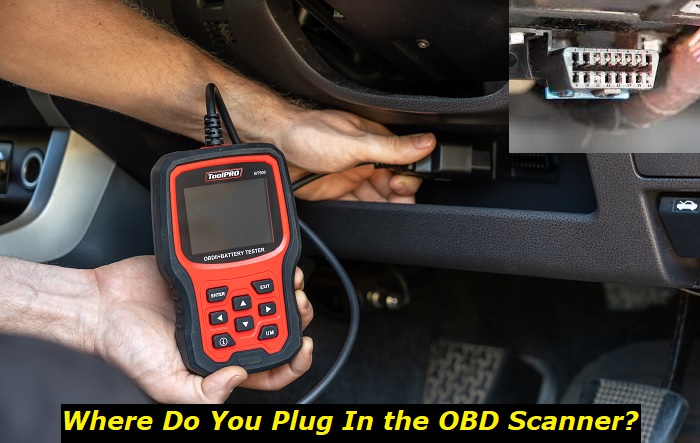
To plug in a check engine light tester, often referred to as an OBD scanner, first, you need to locate the OBD port in your vehicle. Typically, you'll find the OBD port right under your dash on the driver's side.
Scanner tool connection highlights
- Difficulty level:Low
- Needed scan tools:Any scan tool
- Additional equipment:Driver's manual will help
- Timeneeded:1 minute
- Price in a shop:$150 - $250
- DIY repair:Possible

Understanding OBD Scanners
Prior to delving into the instructions for OBD scanners, it is important to grasp its purpose. On-Board Diagnostics (OBD) serves as a vital mechanism for overseeing vehicle functionality and emissions. Without such a system in place, it would be challenging to regulate and maintain optimal performance levels and minimize harmful emissions.
OBD scanners were first introduced all the way back in 1980. It primarily focused on emissions control and was capable of detecting malfunctions in the emissions system. Back then, the scanners weren't as advanced as modern scanners, and their diagnostic capabilities were limited.
The next generation of scanners, referred to as OBD2 scanners which is what we currently use was introduced in 1994. And since the mid-90s, it was mandatory that all vehicles sold in the US had to support OBD2 scanners. The OBD2 scanners offered an expanded scope of diagnostics beyond emission. This generation of scanners encompassed a broader range of systems, such as the engine, transmission, and various sensors.
The primary reason for the introduction of OBD scanners was to regulate emissions and operate efficiently. This aids in reducing harmful pollutants and improving overall vehicle performance.
Where To Plug In The Check Engine Light Tester
For someone who hasn't hooked up an OBD scanner before, this is the biggest question. If you want to effectively use your OBD scanner, you have to know exactly where to plug in the check engine light tester. If you try to search for the OBD port without an idea of its location, it'll be like finding a needle in a haystack. So, before going any further, let's look at where to plug in the check engine light tester.
1) Typical Locations
This prime real estate is favored by many manufacturers due to its user-friendly accessibility. With the OBD port within the driver's reach, you don't have to break your back trying to reach the port, thus it makes diagnostics simple and hassle-free.
Then there are some manufacturers who don't like to put holes in their dash. So, rather than drilling a hole under your dash, the OBD port might be right behind the center console. Can't blame them actually, it makes the dash look more sleek and uncluttered. Even though it is well hidden, its location is still accessible to access when needed and will allow you to operate the scanner conveniently.
Other than these two, there are a few other unconventional locations where you might find your OBD2 port. One such location is the driver's seat. Some manufacturers stealthily place the OBD port under the driver's seat, which is still a very convenient location. It also helps the manufacturers achieve an unobtrusive dash. You might also find your OBD port in your glove compartment.
2) How To Easily Detect Your OBD Port
If you don't know the location of your OBD port, don't worry. There is a simple way to detect your OBD port. To minimize the time spent searching your OBD port, you can simply locate your OBD port using your owner's manual. This invaluable resource often contains a diagram or description of the port's location.
Even if you don't have a hard copy of your owner's manual readily available, with a quick search on the internet, you can find the owner's manual for the exact same model. Online forums are another way to find the OBD port. If your OBD port is in an unconventional location, just like you, many others would have had a hard time finding it. So, you might be able to get insights on where to plug in the check engine light tester from those who have already navigated through this issue.
Also try to use a flashlight when searching for your OBD port, as the port can sometimes hide in the shadows. If your vehicle features an under-dash cover, gently remove it to reveal the OBD port's hiding spot.
Complete Guide On How To Use OBD Scanners
Now that you know where your OBD port is located, it's time to fetch the error codes from your ECU. And here's how you do it.
1) Getting Started
There are certain precautions that you need to be aware of before using a scanner. Before doing anything else, make sure that your car is turned off before you plug in the scanner. This is to make sure that you don't encounter any electrical mishaps. Furthermore, before breaking out your scanner, go through the instruction manual thoroughly.
Before purchasing an OBD scanner, you have to make sure that is compatible with your car. OBD scanners come in different versions, so you need to get a scanner that supports your version. For example, if your car is from the mid-90s or earlier, your car might not support an OBD2 scanner. So, you'd have to get your hands on an OBD1 scanner if you want to complete a scan.
To ensure compatibility, cross-reference your vehicle's specifications with the OBD scanner's compatibility list provided by the manufacturer.
2) Plugging In The Check Engine Light Scanner
Have you damaged a USB or its port by trying to jam it in without checking the orientation? The same can happen with your OBD system. Carefully take note of the connector's shape and its pins. Most pins have a trapezoidal shape, so you can't insert them upside down like your phone charger. If you find it hard to plug it in, don't try to force it.
Force is never the answer, double check the orientation, and slowly try to wiggle it into place. If you've got a rectangular connector, ensure that the pins align with the corresponding slots in the OBD port. Before proceeding to the next step, ensure that your scanner is securely connected to the OBD port.
3) Powering On
With the scanner connected, you can now start the car. This doesn't mean you have to fire up your engine. Just switch on your car so that the ECU is powered up. Now you have to power up your check engine light scanner. This usually involves pressing a button or turning a knob. This will initialize the scanner, and the scanner will start to communicate with your onboard computer.
4) Getting The Trouble Codes
Most OBD scanners in the market are quite user-friendly. So, navigating the interface to get your codes will not be a challenge. Depending on your scanner's model, it may display options for reading trouble codes, viewing live data, and performing other diagnostic functions. Simply follow the instructions on the screen to retrieve the information you need. You can also clear the warning lights while you are at it if that's what you want.
5) Things To Avoid
Diagnostics don't happen instantly, so you are going to spend a few minutes with your scanner connected to your car. And while the scanner is working, you should try not to interrupt the connection. This is where a convenient position for the OBD port comes in handy. If you notice any wiggling or loosening of the connector, pause the process, and reseat the scanner's connector in the OBD port.
If you have trouble retrieving codes, make sure that the software is up to date, both on your scanner and your car.
What To Do After Getting Your DTCs
After successfully connecting your OBD scanner and retrieving the codes, what's next? First off, you need to understand the codes. It's basically decoding the codes from the scanner. Your scanner won't spell out the problems that it retrieved from your ECU. Instead, you get an alphanumeric combination. These codes represent a specific problem in your car. For example, if you get the code "P0300", it would indicate that you have a misfire. Similarly, there are dozens upon dozens of different codes to indicate various problems in your vehicle.
So, how exactly do you decode these DTCs? Decoding is pretty simple these days with the surplus of resources that are available. You can go online and easily decode your DTCs or, you could even use your user manual. It's beneficial to have a list of common DTCs and their explanations for quick reference.
Not all DTCs demand immediate action. Some are minor issues that you can monitor over time. Then there are some that require you to take immediate action. With the ability to reset your warning lights, some people tend to reset the lights and not be concerned with the DTCs. But even if you do so, the warning lights will pop back up if the problem is unsolved. So, with the several DTCs that you get upon scanning your vehicle, you should prioritize the necessary repairs.
About the authors
The CarAraC research team is composed of seasoned auto mechanics and automotive industry professionals, including individuals with advanced degrees and certifications in their field. Our team members boast prestigious credentials, reflecting their extensive knowledge and skills. These qualifications include: IMI: Institute of the Motor Industry, ASE-Certified Master Automobile Technicians; Coventry University, Graduate of MA in Automotive Journalism; Politecnico di Torino, Italy, MS Automotive Engineering; Ss. Cyril and Methodius University in Skopje, Mechanical University in Skopje; TOC Automotive College; DHA Suffa University, Department of Mechanical Engineering


Add comment