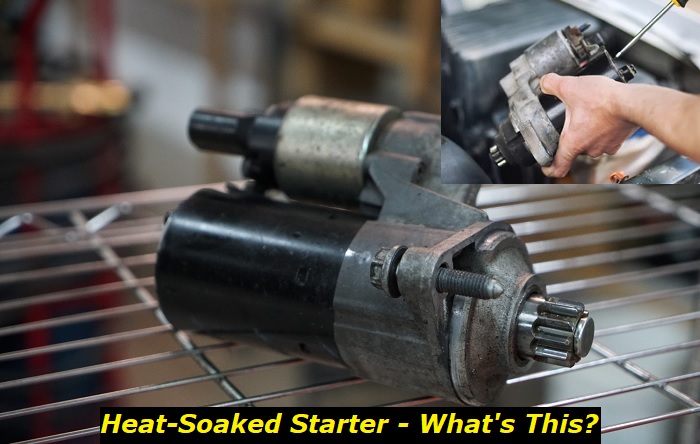
A heat-soaked starter occurs when the temperature of the starter rises above normal levels due to prolonged use or severe conditions. When this happens, the components within the starter will degrade and eventually fail if not attended to. In this article, we will show you just how to properly address this problem to dodge any potentially expensive repairs down the road.
Starter motor problems highlights
- Level of urgency:Medium
- Can you drive?Yes, if it starts
- DIY inspection:Possible but complicated
- DIY repair:Impossible
- Price for repair:$300 - $650
- Common Reasons:Internal problems, gear issues, flywheel problems, mount problems
- Ways to fix:Have it repaired by a professional

Things that Could Happen with a Heat-Soaked Starter
The higher temperatures can cause the starter's windings to overheat, causing them to become brittle and break. The brushes may also suffer from accelerated wear due to the heat, or can even fuse together and jam the motor. In addition, the arcing caused by high temperatures can generate gasses that will corrode vital components within the starter.
How to Fix a Heat-Soaked Starter
When a starter does become heat soaked, it is important to have the starter serviced and repaired to ensure that it is in proper working order before being used again. This will help prevent the components from becoming damaged or degraded due to high temperatures, as well as reduce the risk of further damage occurring if it heats up again.
In addition, any parts that are worn or damaged should be replaced, as they may no longer be able to withstand the heat and could cause more damage or failure if not replaced. If these steps are taken, then the starter should remain in good working order and provide reliable service for a long time.
However, there are cases in which a starter may not be able to be serviced or repaired. In this case, it is important to replace the starter with a new one that is of equivalent quality and size. This will ensure that the engine can start properly without overloading, and reduce the chances of heat soaking occurring again in the near future. With these measures taken, you can ensure that your engine is capable of starting reliably and without fail.
How to Prevent a Heat-Soaked Starter
Heat soaking can be prevented by ensuring that the engine is properly cooled and that the starter is sized correctly to provide enough power for starting without overloading. It is also important to choose a starter quality that matches the application, as using a starter of inadequate quality will put additional strain on the motor and increase its chances of becoming heat soaked.
Moreover, it is important to check the starter regularly and replace any components that show signs of wear or damage, as this will ensure that it performs optimally and avoid heat soaking. By taking these steps and maintaining the starter properly, you can reduce the risk of premature failure due to heat soaking.
Diagnosing the Most Common Factors Triggering the Problem and Their Solutions
In more ways than one, the starter alone is not the one to blame for this particular issue. This can be often traced to the other malfunctioning parts in the electrical system of the vehicle.
When looking for the other possible causes of a heat-soaked starter, here are the factors that you should also consider:
1. High Resistance on the Battery Cables
Most people who have experienced this problem have traced the issue back to the battery cables. So, this is where you should start your extra diagnosis.
When assessing the quality of the battery cables, it is important to check for corrosion or any signs of wear and tear. Corrosion can accumulate on both the connectors at either end of the cable and within the length of the cable itself.
This can be identified by a greenish powdery or crusty residue that accumulates around the terminals or along the length of the cable. It is also important to check for any signs of broken wire strands, fraying insulation, cuts, and abrasions in the insulation.
It is also useful to use a multimeter to test the resistance of each cable. A persistently high level of resistance on the battery cable could indicate that there is an issue with it. If this is the case, then it could be a good idea to clean or replace the affected cable. It would be wise to do the same tests on the battery terminals as part of your repair strategy, too.
If you find that there has been no significant improvement in resistance after cleaning the battery cables and terminals, then it may be time to consider replacing them or the battery itself. This is because a dirty or faulty battery may have already caused permanent damage to the cables or terminals, and replacing the battery would be the best way to solve this problem.
Finally, if your assessment indicates that the cables and terminals are in good condition with no signs of wear and tear, then it is likely that there could be an issue with the starter itself, or the wiring connecting it to the battery. In this case, then it would be worth continuing diagnostics in those areas.
2. Relay Problems in the Starter
When assessing the quality of the starter relay, it is important to use visual cues and a multimeter. In some cases, the relay may be contaminated or shorted. If any of these is the suspected reason, a visual inspection can detect most issues with the relay that needs to be cleaned or replaced.
However, if there are any signs of corrosion on the relay's metal contacts, a multimeter can be used to check for further damage. Additionally, it is also important to observe if there are any dents or deformities on the housing of the relay.
If the starter relay has been subjected to excessive heat soaking due to prolonged use, it could lead to the deterioration of its internal components, increasing the chances of failure. The multimeter can be used to check the continuity of the relay by measuring its resistance value. If there is any decrease in this value, then it may indicate that the relay requires cleaning or replacement.
It is also important to note that if the starter motor does not turn when engaging the ignition switch, then it is also possible that the starter relay could malfunction. In this case, a technician can inspect the wiring harness and solenoid switch for any visible damage. If no issues are found, then the starter relay should be tested using the same techniques outlined above.
It is important to remember to test all connections related to the starter relay, as inadequate contact can result in a faulty starter system. If any of these tests indicate that the relay is faulty, then it should be replaced or cleaned immediately to avoid extra issues.
3. Starter Binding Due to Misalignment
To diagnose the cause of a starter binding due to misalignment, an experienced technician should first inspect all mounting points and fasteners to ensure they are properly tight and secure. Next, care must be taken to make sure that there is no foreign matter lodged between the drive gear and the flywheel teeth. If these initial steps do not resolve the issue, further investigation may be required.
One potential cause of misalignment is a worn starter motor mounting bracket or broken flywheel teeth. In this case, the problematic components should be replaced with new ones to ensure proper alignment.
Additionally, if the starter was recently installed or moved and there is no apparent hardware defect causing the misalignment, it should be re-positioned until the gear is properly aligned and fits snugly within the flywheel.
Lastly, if there has been a large change in engine temperature or the vehicle overheated recently, thermal expansion of surrounding components could cause misalignment. In this case, simply allowing some time for everything to cool and return to normal dimensions should solve the issue.
Overall, it is important for technicians to thoroughly inspect all mechanical components and consider any recent changes in temperature before attempting to diagnose a binding starter due to misalignment.
Replacement of worn components, re-positioning of the starter motor, or simply allowing time for thermal expansion can all provide potential solutions for the problem. It is important to remember that the misalignment of the starter motor can lead to more serious problems. Therefore, all steps should be taken to ensure proper alignment of the starter and all other components before operating the vehicle.
4. Faulty Starter Solenoid Switch
A faulty starter solenoid can lead to a variety of issues within the starter system. A technician should first observe the starter motor while it is engaged to identify any abnormal noises or excessive vibration caused by the operation of the solenoid switch.
Additionally, if there is an issue with the solenoid not engaging at all, then a multimeter should be used to measure the resistance of the solenoid switch. If there is no continuity, then it may indicate that the solenoid requires replacement.
It is also important for a technician to inspect all electrical connections related to the starter system and replace any damaged or corroded wiring. Furthermore, if the starter motor has been exposed to extreme temperatures or moisture, it is possible for the solenoid to become stuck in the engaged position.
If this occurs, then the starter motor should be disassembled and all components of the switch should be checked for any visible signs of damage. In most cases, replacing a faulty starter solenoid will resolve any issues with a heat-soaked starter.
Conclusion
The ways to address a heat-soaked starter depend on the factors triggering it. Typically, the cause of the problem may be due to the reasons identified here. However, this can also be a result of other malfunctioning components within the electrical system of your auto.
No matter what the source of the trouble is, it is important to bring your vehicle to a mechanic for immediate diagnosis and repairs just to be sure.
About the authors
The CarAraC research team is composed of seasoned auto mechanics and automotive industry professionals, including individuals with advanced degrees and certifications in their field. Our team members boast prestigious credentials, reflecting their extensive knowledge and skills. These qualifications include: IMI: Institute of the Motor Industry, ASE-Certified Master Automobile Technicians; Coventry University, Graduate of MA in Automotive Journalism; Politecnico di Torino, Italy, MS Automotive Engineering; Ss. Cyril and Methodius University in Skopje, Mechanical University in Skopje; TOC Automotive College; DHA Suffa University, Department of Mechanical Engineering


Add comment