Headliner foam is one of those components of your vehicle that you tend not to notice until it starts wearing out. It can be tempting to find simple, inexpensive solutions to an old headliner, but the best way to keep your vehicle looking fresh is to simply replace an old headliner. What's the best way to do this?
The easiest way to remove headliner foam is to simply remove the interior pillars and trim of your vehicle, remove the headliner, clean it of old foam, and replace the fabric with new material. This task may sound straightforward, but there are a number of steps to remember, and it's important to be careful and take your time to avoid damaging the rest of your vehicle's interior.
Keep reading to learn more about how to remove your vehicle's headliner foam, and how to make sure your work looks professional and well done.

What is the Headliner?
First of all, what is a headliner? The headliner is the panel covering the roof of the interior of your vehicle. It's the soft, often slightly spongy material just overhead that helps you and your passengers not bump your heads on your way into or out of the car.
Headliner is often produced as a single panel consisting of a layer of foam and a layer of fabric and runs the entire length of your vehicle's interior roof.
What Kind of Problems Can Headliners Have?
It is common for foam headliners to begin sagging and hanging down over time. This is a natural effect of age, and there's nothing you can really do to prevent this.
The outer layer of fabric simply begins to separate from the main foam body of the foam headliner and becomes slightly obnoxious and unsightly as it droops. While some may wonder if you can repair the outer fabric layer and re-adhere it to the headliner foam, it's a lot simpler to just replace the fabric layer with a new one.
Let's run down all the steps and the materials you'll need to do this job right.
What Materials Will You Need?
To remove and replace the foam headliner, you'll need:
- A screwdriver
- Multiple cups to hold all of the screws and bolts that you'll remove so they can be put back in when the job's done (we recommend at least seven small cups to help keep separate screw components separate)
- A new fabric layer for the headliner
- Spray-on Automotive Fabric Glue
- Scissors
- A Box Cutter
- Small clamps
Remove Your A-Pillars and B-Pillars
The first step is going to be to remove your plastic A and B pillars. Find the screws that keep them adhered to the interior, and remove them. As you remove each pillar, be sure to keep them off to the side safely and carefully, so they'll be easy to install again.
Make sure to keep all of your screws carefully in one place, and label the cups you're using so that you know which screws came from which interior component.
Remove Your Interior Plastic Trim
Now that you've got your plastic pillars off, go ahead and begin removing any interior trim that's holding back or is in front of your headliner foam panel. This may include seatbelt casings and side trim.
Again, keep everything off to the side and orderly for easy re-installation. Now, go ahead and remove anything else holding back the foam headliner. This would include handles above the car doors, any trim around the sunroof or moon roof, sun visors, and any overhead lighting fixtures in your vehicle.
Remove Your Old Headliner
Now, what are you left with? The only thing that should be holding back your foam headliner at this point is weather stripping. Go ahead and peel back (but don't remove) that stripping to help you gently pry loose the headliner and remove it from the roof.
Your headliner should come off as a single panel. To get it out of the vehicle, you'll have to carefully maneuver it and slide it out one of the fully open doors. Try reclining the seats to make this easier. In a worst-case scenario, you'll have to fully remove the seats to get the old headliner out.
Strip Old Fabric and Brush Old Foam
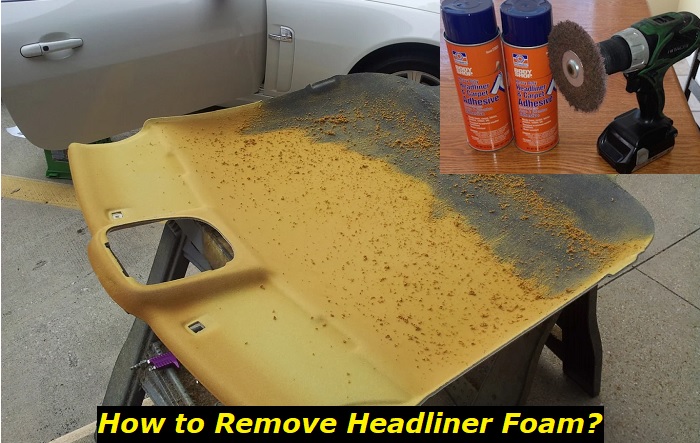
Now that you've got your old headliner out, you should be able to remove the old, pilled foam layer from the foam backing. Strip off the fabric layer first, and dispose of it. We'll replace it in a bit. Now, turn your attention to the foam backing.
You should notice that the foam backing has a kind of soft, fuzzy layer on it. This is typical with age, and this fuzziness means that the glue and foam have aged beyond being effective. You'll have to remove this fine layer of foam fuzz.
Using a wire brush (either a mechanized brush or a manual one), begin to brush away the old, pilled foam from the backing. You'll notice a slightly paler layer of foam just underneath. So long as the outer layer of pilled foam has been brushed away, you've removed enough.
Brush away that entire pilled layer from the entire length and breadth of the foam backing. It'll make quite a mess, and you'll need to vacuum it up at some point. It is advisable to wear mouth, nose, and eye protection during this stage to avoid breathing in any of the fuzz or getting any in your eyes.
Place New Fabric on the Backing
Now, you'll have to get your new fabric layer for the foam backing. Make sure it overlaps about four inches beyond the original sheared foam backing. Fold half of the foam fabric layer back at the center, and apply a generous amount of spray-on glue to the back of the fabric, and to the foam backing.
Gently pat the new fabric layer down in place over the foam backing, and do the same with the other side. Use the box cutter to accommodate any holes in the backing (such as holes where lighting fixtures, screws, or seatbelt casings would go).
Use your small clamps to hold the new fabric in place over the edges of the backing, making sure that the fabric curls around the edge slightly. Allow your new fabric layer to dry for at least 24 hours before putting it back into your vehicle.
Reinstall Your Headliner
Now that your foam headliner has a nice new layer of fabric and the glue has dried, let's get it back into your vehicle. You'll be doing all the steps of removal, only backward.
Get the newly renovated foam backing into your car or truck first. Make sure that you have it maneuvered in there so that it's facing the right way. Now, gently peel back the weather stripping and slide your foam backing into that stripping.
Reinstall the trim, sun visors, and paneling that you initially removed from the interior. Have your cups full of screws and bolts on hand to reinstall these components much quicker.
Tips and Tricks
One of the best things you can do for yourself during this project is to use an electric drill with a wire brush attachment. Your work will go so much faster, and you'll save quite a bit of muscle work and effort as you go.
Another great tip? Have a vacuum on hand to suck up the pilled fuzz as you work. You'll have less mess to clean up at the end, and your workshop will look better, too.
Label your cups for each separate component's attaching screws, bolts, and hardware. For example, write "right A-pillar" or "left B-pillar" on the respective cups, keep them organized, and get your trim and paneling back on that much faster.
Make sure that the replacement fabric you order matches the color of your car interior. That may sound simplistic, but it's an easy detail to overlook. If you're uncertain, request a sample of the fabric backing from the manufacturer to make sure.
What Not to Do
A common mistake that people make is to attempt to fix a sagging headliner with glue, staples, or thumbtacks. Don't do this. It won't look good, the glue will just seep through the fabric, and the headliner will continue to come apart with age.
Don't rush this project. It can take a while to position and apply the new fabric layer carefully, and you're going to want to make sure it conforms nicely to the shape of your foam backing.
Don't skimp on the headliner glue. There are specific adhesives made for automotive fabric, and they work great. Don't try this with just any glue. Take the time and effort to make a trip to your local automotive store and get the right adhesive for the job. If you try to save money, your project likely won't look as good and may have to be redone or replaced sooner.
Conclusion
The simplest way to remove old headliner foam is to carefully unscrew all interior car paneling and fixtures that hold the roof headliner back, and then remove the entire unit. Peel away and dispose of the old fabric layer, and then carefully brush away the pilled layer of fuzzy foam with a wire brush. A wire brush attachment on a power drill will work best here.
Use automotive fabric glue to adhere your new fabric layer on your sheared foam backing, and carefully pat it into place, making sure to cut away fabric over any holes in the backing. Allow it to dry for 24 hours before reinstalling it in your vehicle.
Make sure to wear nose, mouth, and eye protection as you shear away old foam fuzz, and keep all of your hardware in separate labeled cups for easy reinstallation.
About the authors
The CarAraC research team is composed of seasoned auto mechanics and automotive industry professionals, including individuals with advanced degrees and certifications in their field. Our team members boast prestigious credentials, reflecting their extensive knowledge and skills. These qualifications include: IMI: Institute of the Motor Industry, ASE-Certified Master Automobile Technicians; Coventry University, Graduate of MA in Automotive Journalism; Politecnico di Torino, Italy, MS Automotive Engineering; Ss. Cyril and Methodius University in Skopje, Mechanical University in Skopje; TOC Automotive College; DHA Suffa University, Department of Mechanical Engineering


Add comment